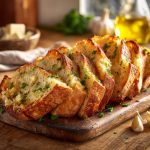
The Best Garlic Bread Recipe (Crispy, Buttery, and Foolproof)

Garlic bread should not be an afterthought. Done right, it steals the spotlight—crispy edges, buttery center, and real garlic flavor. Done wrong, it’s soggy, bland, or worse… burnt. The difference isn’t fancy ingredients. It’s technique. Once you get that, you’ll never serve “just okay” garlic bread again.

How to Make the Best Homemade Garlic Bread (Crispy Outside, Soft Inside)

This garlic bread recipe teaches you how to achieve the perfect balance of a crispy crust and a soft, buttery interior every time. Instead of just mixing garlic and butter, you’ll learn how heat, bread choice, and timing affect the final result.

Whether you’re serving pasta or building a simple appetizer, this method helps you make garlic bread that actually tastes like something worth eating.

Fast Answer

Garlic bread is best when you balance butter, garlic, and heat—spread seasoned butter evenly, bake hot, and finish uncovered for crisp edges and a soft, flavorful center.

Start Here: Your Garlic Bread Game Plan

  • Choose the right bread: Use a sturdy loaf like Italian or French bread for structure and texture.
  • Make a balanced garlic butter: Raw garlic is strong—mix it well with butter and salt.
  • Bake, then crisp: Start wrapped or covered, then finish uncovered for crunch.
  • Don’t overload: Too much butter leads to soggy bread instead of crisp edges.

Why This Recipe Works

  • Controlled heat: Baking first warms the center without burning the garlic.
  • Even butter distribution: Every bite gets flavor—not just the edges.
  • Two-stage cooking: Covered for softness, uncovered for crisp texture.
  • Garlic balance: You get flavor without harsh, raw bitterness.

Garlic Bread

How to make homemade garlic bread the is quick, easy and delicious
Prep Time5 minutes
Cook Time10 minutes
Total Time15 minutes
Course: Side Dish
Cuisine: Italian
Keyword: bread, garlic, garlic bread
Servings: 1 loaf

Equipment

  • 1 baking sheet
  • 1 bowl

Ingredients

Instructions

Prep the Bread

  • Slice your loaf in half lengthwise.
  • Use day-old bread for better structure and crisping.

Make Garlic Butter

  • Mix softened butter, minced garlic, salt, and optional parsley.
  • Mash garlic into the butter to distribute evenly and mellow its bite.

Spread Evenly

  • Spread the mixture edge to edge.
  • Don’t leave dry spots—those turn into bland bites.

Baked Covered

  • Place halves together or loosely tent with foil. Bake at 375°F for 10–12 minutes.
  • This warms the bread and melts the butter without burning garlic.

Finish Uncovered

  • Open the bread and bake another 3–5 minutes.
  • Watch closely—this is where crisp magic happens (or burning).

Slice & Serve

  • Cut into pieces and serve immediately.
  • Garlic bread waits for no one.

Notes

Pro Tip: For extra flavor, rub the cut bread lightly with a raw garlic clove before adding the butter.

Oven Baked - Under the Broiler - Air Fryer

Method Best for Typical time & temp Pros Cons Quick tip
Oven (baked) Batch cooking; even toasting; soft interior 375°F (190°C) • 10–15 minutes
  • Even heat; gentle browning
  • Good for whole loaves or many servings
  • Butter soaks in for soft center
  • Takes longer than broiling or air fryer
  • Less intense crisp on top unless broiled after
Cover with foil first if you want the interior very soft; remove foil last 2–3 min to crisp.
Broiler Fast browning; strong top crust; small batches Broil high • 1–3 minutes (watch closely)
  • Very quick — great for last-minute crisping
  • Creates a golden, slightly charred top
  • Good when you already baked the loaf
  • Easy to burn if unattended
  • Uneven results if loaf is thick or far from heat
  • Not ideal for large batches at once
Place rack 4–6 inches from the element. Stay by the oven and check every 30 seconds.
Air Fryer Quick single to small servings; super-crispy edges 350–375°F (175–190°C) • 4–8 minutes
  • Fast and energy efficient
  • Produces very crispy crust with tender inside
  • Great for reheating without sogginess
  • Limited capacity — may need batches
  • Can dry the center if overcooked
  • Smaller loaves might need trimming
Give slices space in the basket for airflow. Check at the halfway point to avoid over-browning.

Small Tweaks, Big Flavor Payoff

  • Use real butter: It delivers clean, rich flavor without the artificial aftertaste of margarine.
  • Balance the butter: Coat evenly—too much leads to greasy, soggy bread.
  • Add a pinch of salt: It wakes up both the garlic and the bread.
  • Mash garlic into butter: Spreads flavor evenly and prevents burnt bits.
  • Bake at moderate heat: Around 375°F gives you a crisp crust and soft center.
  • Finish under the broiler: 1–2 minutes creates a golden, slightly crunchy top.
  • Use sturdy bread: French or Italian loaves hold up and toast better.
  • Add herbs after baking: Keeps parsley bright and fresh, not dull and cooked.
  • Serve immediately: Garlic bread waits for no one—texture fades fast.
  • Play with toppings: Parmesan, mozzarella, chili flakes, or olive oil add personality.
Adding garlic butter to garlic bread

Storage & Shelf Life

Homemade garlic bread tastes best fresh, but you can store it for later. In the refrigerator, wrap cooled garlic bread tightly in foil or place it in an airtight container.

It will keep for about 3–4 days. Chilling helps slow mold growth, but it can dry the bread, so reheat it gently in the oven to restore softness.

For longer storage, the freezer works best. Wrap individual slices or whole halves in foil, then place them in a freezer bag to prevent freezer burn. Frozen garlic bread keeps its flavor for up to 3 months.

To serve, bake straight from frozen at 375°F (190°C) for 10–15 minutes, or until heated through and crisp. Avoid microwaving frozen bread, as it can make the bread soggy.

Proper storage ensures you can enjoy garlic bread anytime without losing its flavor, texture, or buttery goodness.

What Most Cooks Get Wrong

  • Too much butter: Leads to greasy, soggy bread instead of crisp texture.
  • Raw garlic overload: Overpowers instead of enhances.
  • Skipping the covered step: Results in burnt edges and cold centers.
  • Using soft sandwich bread: Lacks structure and turns mushy.

Quick Fixes & Pro Tips

  • Too garlicky? Add more butter or a squeeze of lemon to balance.
  • Too soft? Broil briefly for extra crispness.
  • Want depth? Roast the garlic before mixing into butter.
  • Upgrade it: Add grated Parmesan before the final bake.

Storage & Make-Ahead

  • Store leftovers wrapped at room temp for 1 day or refrigerate for up to 3 days
  • Reheat in oven (not microwave) to restore crispness
  • Make garlic butter ahead and refrigerate up to 5 days
  • Freeze assembled (unbaked) garlic bread for up to 2 months
Garlic Bread FAQ

What is the best bread for garlic bread?

Use French or Italian bread for the best structure and crispness.

Can I use garlic powder instead of fresh garlic?

Yes, but fresh garlic gives stronger, more authentic flavor.

How do I keep garlic bread from getting soggy?

Use less butter and finish baking uncovered to crisp it.

Should I wrap garlic bread in foil?

Wrap it for the first stage to warm evenly, then unwrap to crisp.

Can I make garlic bread ahead of time?

Yes. Assemble it and refrigerate, then bake when ready.

Why is my garlic bread bitter?

Garlic burned during cooking—lower heat or cover longer.

Can I freeze garlic bread?

Yes. Freeze before baking for best results.

How do I make it extra crispy?

Finish under the broiler for 1–2 minutes.

“Be honest—crispy edges or soft and buttery center… which side are you on? Or did you crack the code and get both? Let me know how your garlic bread turned out in the comments below.”

Leave a Reply

Your email address will not be published. Required fields are marked *

Recipe Rating


This site uses Akismet to reduce spam. Learn how your comment data is processed.