The Secret to Perfectly Roasted Garlic Every Time

Tired of garlic that hits harder than your morning alarm? Roast it, and watch the magic: sharp, stinging cloves turn soft, sweet, and utterly spreadable. One head in the oven, and your sauces, soups, and mashed potatoes suddenly speak fluent gourmet. Stick around—this is garlic’s glow-up you don’t want to miss. 🧄

Why Roasting Garlic Is Helpful in the Kitchen

  • Mellows the flavor: Roasting transforms garlic’s sharp bite into a sweet, mellow, almost buttery taste.
  • Easier to use: The cloves become soft and spreadable, making them easy to mash into sauces, soups, dressings, or mashed potatoes.
  • Adds depth to dishes: Roasted garlic brings a rich, savory flavor that enhances everything from pasta to roasted vegetables.
  • Less overpowering: Because the flavor is milder, you can use more garlic without overwhelming a dish.
  • Great for make-ahead cooking: Roast several heads at once and keep them in the refrigerator to quickly add flavor to meals throughout the week.

Roasted Garlic Made Easy: Step-by-Step Guide

Roasting garlic is one of the easiest ways to transform its flavor. Raw garlic is sharp and bold, but roasted garlic turns soft, sweet, and buttery. It’s magic in the oven. You don’t need fancy tools—just a bulb of garlic, a bit of oil, and some foil or a small baking dish.

Why roast garlic? Because it adds depth and richness to almost anything. Spread it on toast. Stir it into mashed potatoes. Whisk it into dressings or blend it into soups. It brings warmth without the bite.

Roasting also makes garlic easier to digest. The harsh edge mellows, and the cloves become golden and tender. It’s perfect for people who love garlic but want a gentler touch.

You can roast one head or a whole batch. It keeps well in the fridge and freezes beautifully. That means you’ll always have a spoonful of savory goodness ready to go.

In this post, I’ll walk you through how to roast garlic step by step. You’ll see just how simple it is—and why it’s worth doing. Once you taste the difference, you might never go back.


Roasting garlic
Print Recipe
5 from 2 votes

How to Roast Garlic

Roasted garlic transforms pungent raw cloves into sweet, soft, and buttery gems perfect for spreading, mashing, or flavoring any dish.
Prep Time10 minutes
Cook Time35 minutes
Total Time45 minutes
Course: Herbs & Spices
Cuisine: American
Keyword: garlic, roasted garlic

Ingredients

Instructions

Prepping the Garlic

  • Start by removing any loose layers of skin from the whole head of garlic.
    Don't take too much off; you don't want the cloves breaking off.
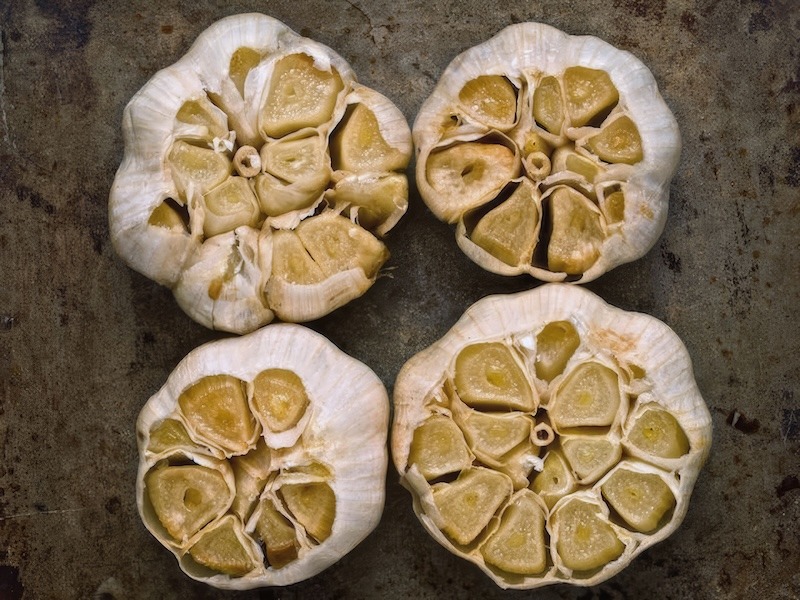
  • With a sharp knife, carefully cut off the top ¼ of the head so the cloves are exposed. Then, you can toss the part you cut off and reserve the rest of the head.
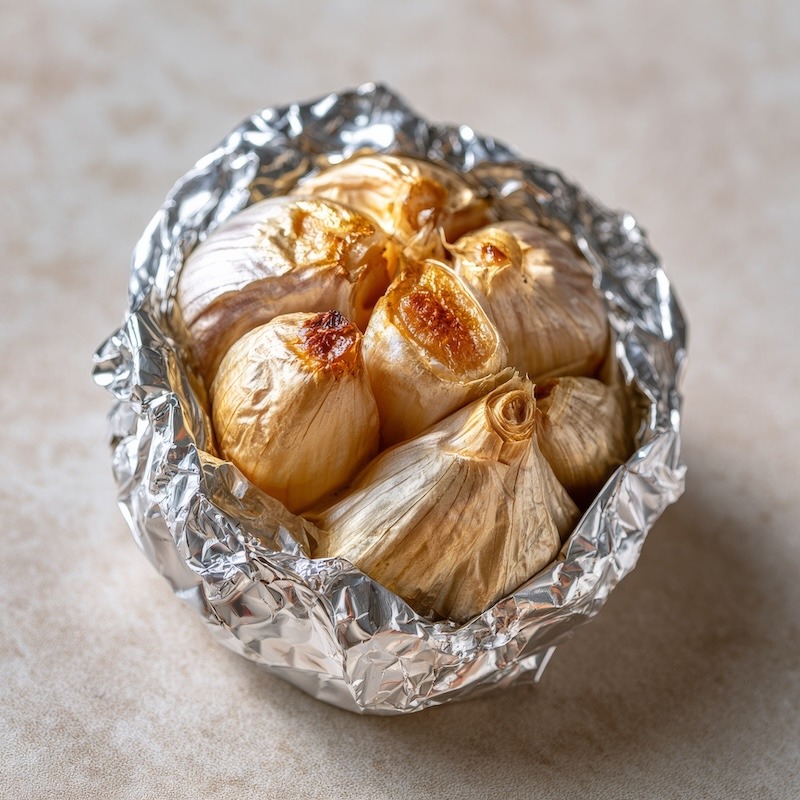
  • If you are only roasting one or two garlic heads, tear off one or two sheets of aluminum foil large enough to wrap the entire head of garlic.
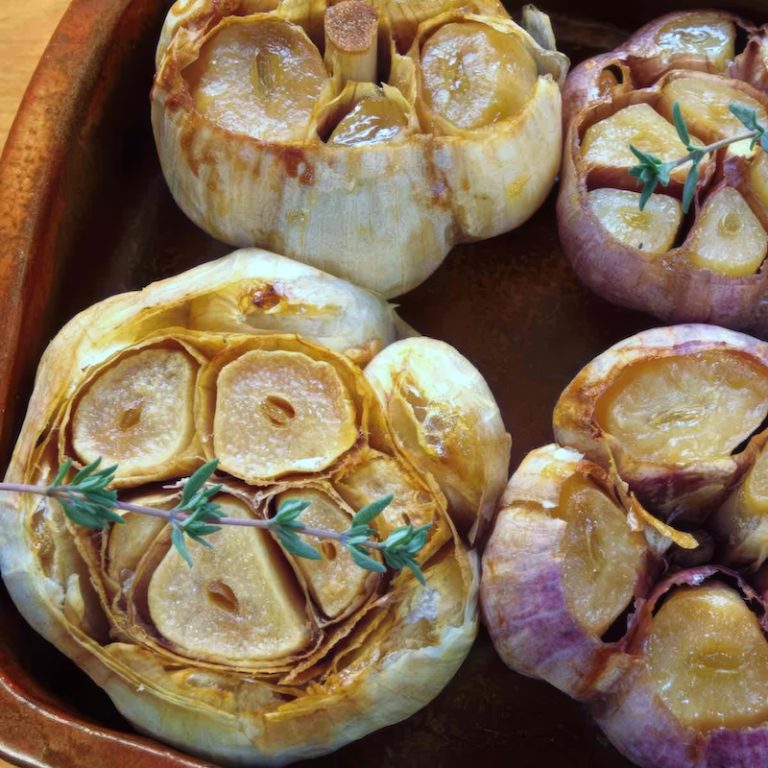
  • If you are roasting multiple heads of garlic, place the heads, cut side up, in a small roasting pan or baking dish large enough to accommodate the number of heads you are roasting.
  • Drizzle a little olive oil onto each head and season with sea salt and freshly ground pepper.
    If you want to play around with some different flavors, try to experiment by adding a little minced rosemary or lemon zest to the seasoning. Again, the number of options is huge.

Roast the Garlic

  • If you are using aluminum foil, tightly wrap the garlic head in foil and place it directly onto the oven rack. This works great when roasting another ingredient because the garlic takes up very little space.
    You can even use this method when firing up the barbecue to grill vegetables, steaks, or chicken. Depending on the temperature of the oven or grill, it should take about 40 - 45 minutes for the garlic to turn a golden brown as they soften up.
  • If you are roasting a bunch of heads in a baking dish, place the pan into the oven uncovered and roast for 30 - 35 minutes until the garlic turns golden brown and the cloves become tender. If they are not softened enough, just put them back in the oven for 5 - 10 minutes more.

After The Garlic Is Roasted

  • No matter what method you use to roast the garlic, let them cool down after removing them from the oven before handling it.
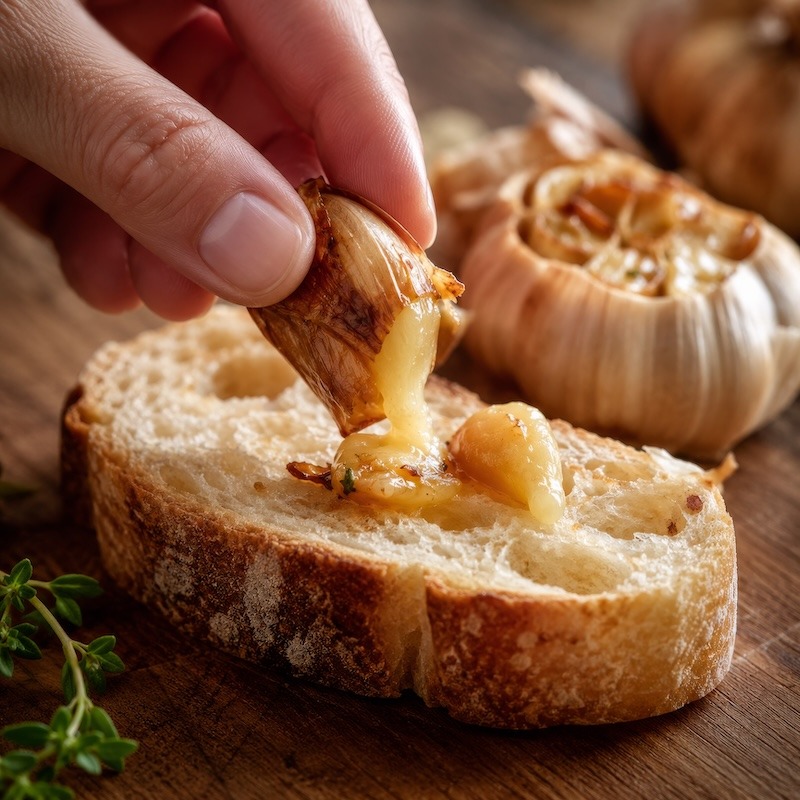
  • Then, when they are cool enough to handle, unwrap them from the aluminum foil or remove them from the roasting pan and squeeze out the garlic from the bottom of each clove with your fingers.
  • Yes, it's messy, but please resist the urge to overeat the garlic while squeezing. The aroma of roasted garlic is so intoxicating that you will have to use all your willpower to keep yourself from eating too much.

Notes

If you are roasting the garlic for a meal you are cooking that day, use what you need and store the rest in an airtight container in the refrigerator for up to two weeks. If you don't have a recipe calling for roasted garlic later in the week, try substituting in any recipe calling for garlic or just spread some on a slice of Italian bread for a quick snack.
This is an easy cooking technique and if you do it while roasting something else, it really doesn't add that much time or effort to what you are cooking but it really makes a big difference.
 

Step By Step Instructions

  1. Preheat your oven to 400°F (200°C).
  2. Peel off the loose outer layers of a whole garlic bulb.
  3. Slice off the top 1/4 inch of the bulb to expose the tops of the cloves.
  4. Place the bulb on a sheet of foil or in a small baking dish.
  5. Drizzle with olive oil (about 1–2 teaspoons), making sure it coats the exposed cloves.
  6. Wrap the bulb tightly in foil or cover the dish.
  7. Roast in the oven for 35–45 minutes, or until the cloves are soft, golden, and fragrant.
  8. Let it cool slightly, then squeeze the roasted cloves out of their skins.
  9. Use immediately or store in an airtight container in the fridge for up to one week.


Optional: Mash the cloves into a paste for easy spreading or mixing into recipes.

roasted garlic recipe

Great Ways to Use Roasted Garlic

Use Description Why It Works
Spread on Toast or Bread Roasted garlic becomes soft and spreadable, like butter or jam. Adds rich, mellow flavor without the sharp bite of raw garlic.
Mashed into Potatoes Blend roasted garlic into mashed potatoes for added depth. Enhances creaminess and adds a sweet-savory flavor boost.
Whisked into Salad Dressing Mash and mix with olive oil, vinegar, and herbs for dressings. Adds body and subtle garlic flavor without overpowering.
Stirred into Pasta or Risotto Blend roasted garlic into sauces, or mix directly into cooked grains. Gives a savory base note that elevates the entire dish.
Mixed with Butter Combine with softened butter for a flavorful garlic spread. Perfect for steaks, bread, vegetables, or seafood.
Blended into Soups Puree roasted garlic into soups like tomato, cauliflower, or potato. Adds silky texture and sweet, roasted depth without sharpness.
Used in Hummus or Dips Replace raw garlic with roasted in hummus or creamy dips. Creates a smoother, more balanced flavor that’s easy to love.

One Head or More

My method for roasting garlic depends on how many heads I will roast and if I’m roasting anything else with them. For example, if I’m only going to roast one head of garlic, I’ll prep it, wrap it up in aluminum foil, and roast it in a preheated oven for about 40 minutes.

If I’m going to roast several heads of garlic, I’ll cook them in a small roasting pan. The oven temperature also depends on whether I cook them separately or with something else.

If done separately, I’ll preheat and roast the garlic at 400°F for about 30 – 35 minutes but if I’m roasting a chicken or braising beef at 350°F, I’ll roast the garlic a little longer.

I like to multitask my cooking as much as possible; this is where meal planning can be particularly helpful. If you know you will need roasted garlic for a meal you are preparing on Friday and plan to roast a chicken on Wednesday, why not add some garlic to the chicken so you don’t have to heat up your oven again?

This is especially helpful during the summer on those hot days.

4 Responses

  1. 5 stars
    Great piece on roasted garlic – TY!! I grow so much of it in my garden annually that I now roast a large part of it. After it’s squeezed out, I fill ice cube trays with the “mash” and once frozen, pop them into resealable vac seal bags. I have roasted garlic at my disposal at all times; 15 seconds in he microwave and it’s ready to use!!

    PS. I enjoy your website and the articles you present. I too am in a Wall Street profession as founder of my RIA firm, but still working (happily)!! Love to spend down time with all types of food activities, from homemade pastas, to canning, to a variety of charcuterie. Keep up the good work with your site!!

    1. Thanks Joe for the garlic tip. If you don’t mind, I’ll add it to my text for other cooks to enjoy. Glad to hear you are still enjoying “the business”. Please keep me updated with your cooking adventures.

  2. 5 stars
    Love, love roasted garlic and I’m so glad you’re putting your method out for everyone. May I add just one thing – for 2-4 heads of garlic to be roasted, I add 1/3 to 1/2 cup of olive oil and after wrapping in foil, putting the pkg. (to prevent leaks) inside a larger baking bowl. The garlic oil from the garlic heads, I put in a container and freeze. Having garlic oil at your finger tips is as good as having the garlic (which I put the cloves in a baggie for the freezer, too.

Leave a Reply

Your email address will not be published. Required fields are marked *

Recipe Rating


This site uses Akismet to reduce spam. Learn how your comment data is processed.