Fast Answer
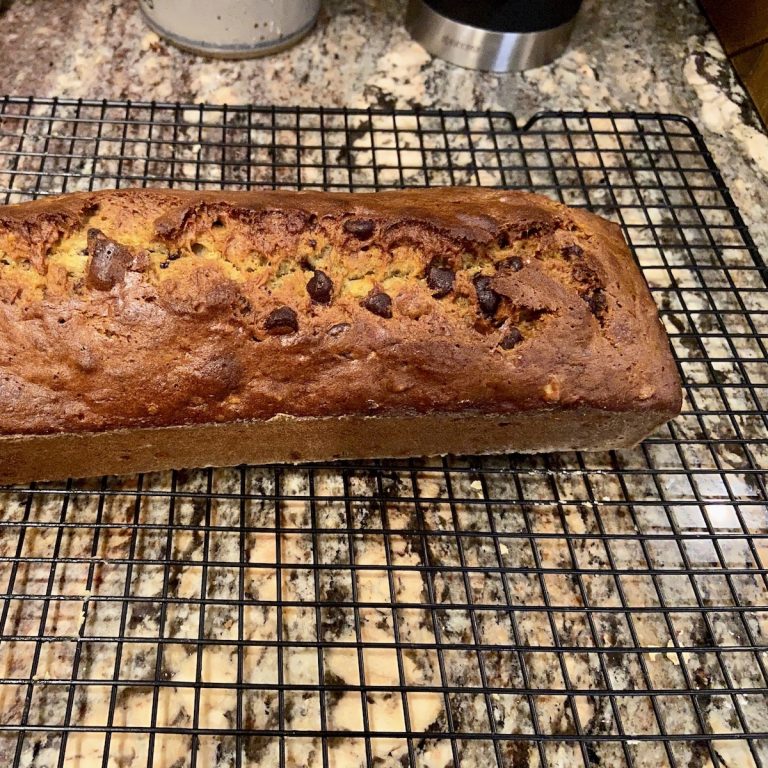
Banana bread works best with overripe — almost black — bananas because the starch has converted to sugar, giving you more sweetness, more moisture, and stronger banana flavor than yellow bananas can produce. This recipe uses vegetable oil instead of butter for a more tender, cake-like crumb, chocolate chips folded into the batter, and the one rule most home bakers skip: mix until just combined and stop. Overmixing is why banana bread turns out dense and tough.
The Recipe That Never Lets an Overripe Banana Go to Waste
Banana bread is one of those recipes that almost every home baker has a version of — and most versions are pretty good. The difference between pretty good and genuinely great usually comes down to three things: how ripe the bananas actually are, what fat you use and why, and whether you stopped mixing before you should have.
This post covers all three, plus the chocolate chip version my wife has been making for years.
Why the Banana Has to Be Almost Black
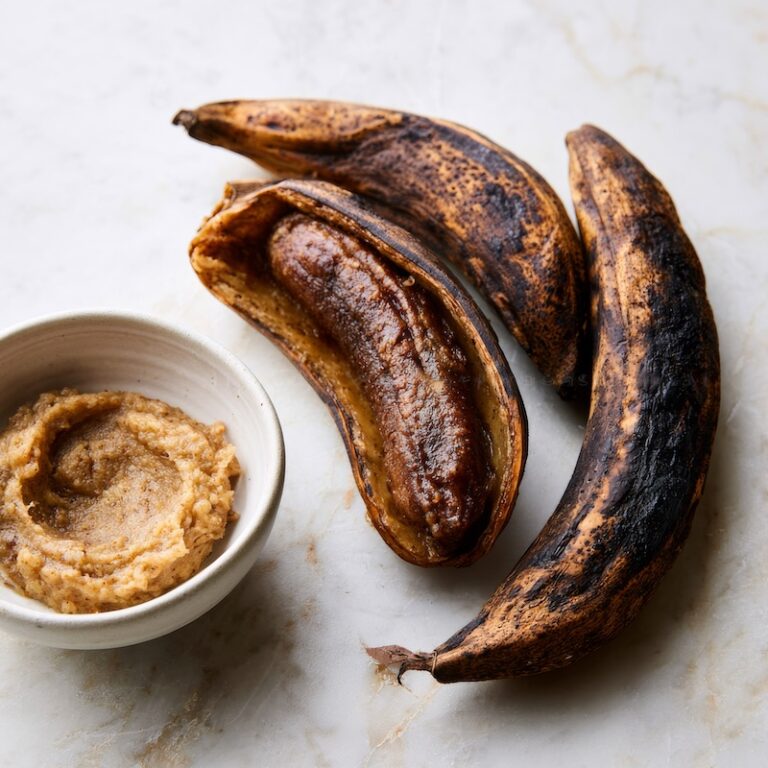
Most banana bread recipes say “ripe bananas” and leave it there. That’s not specific enough. A yellow banana with a few brown spots will produce acceptable banana bread. A banana that’s mostly brown or black — soft, fragrant, almost collapsing — will produce noticeably better banana bread. Here’s why.
As a banana ripens, enzymes break down the starches inside the fruit and convert them to simple sugars. A green or yellow banana is mostly starch — that’s why it tastes mild and slightly chalky. A heavily spotted or black banana has completed most of that conversion — the starch is sugar now, which means the banana is sweeter, wetter, and more intensely flavored than it was a week ago.
That sweetness, moisture, and intensity are exactly what banana bread needs. The banana is doing three jobs at once: sweetening the batter, adding moisture, and providing the flavor that makes it taste like banana bread rather than a plain quick bread. A yellow banana does all three jobs adequately. An almost-black banana does all three jobs significantly better.
My wife’s system: when bananas get too ripe to eat, they go straight into the freezer in their skins. Frozen bananas thaw into soft, collapsed, deeply sweet fruit that’s perfect for this recipe — and freezing slightly accelerates the sugar conversion. Thaw them overnight in the refrigerator or for a few hours at room temperature. When you peel them, they’ll look brown and unappetizing. That’s exactly right. Mash them thoroughly — no large chunks — before they go into the batter.
The Rule Most Home Bakers Break: Stop Mixing Early
Banana bread is a quick bread — leavened with baking soda rather than yeast, mixed by hand rather than kneaded. That matters because quick breads are particularly sensitive to overmixing.
When you mix flour with liquid, gluten strands begin to form. The more you mix, the more developed those strands become — and the more developed the gluten, the tougher, denser, chewier the result. In bread dough, developed gluten is the goal. In banana bread, it’s the enemy.
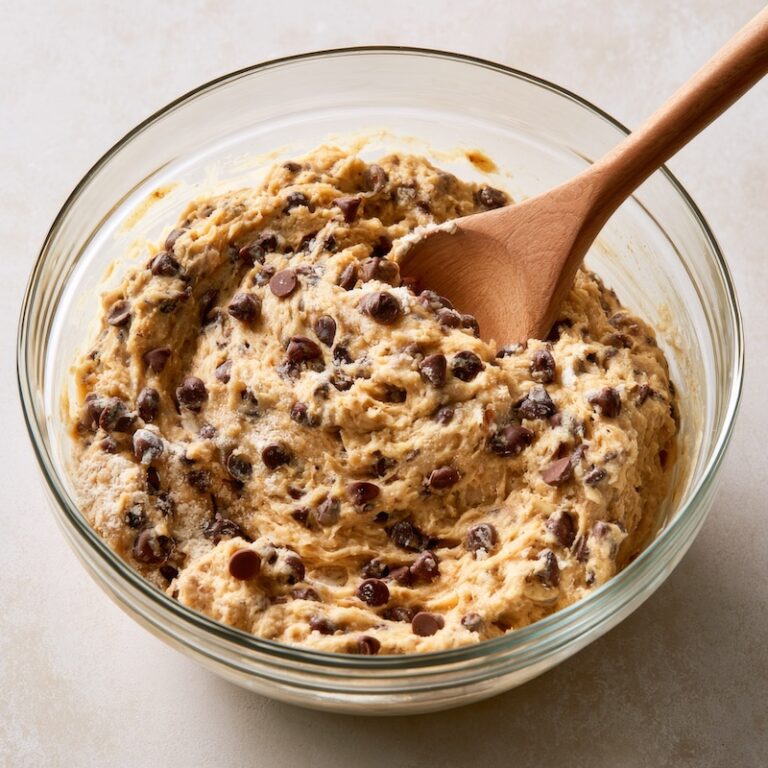
Mix the wet ingredients together first, then add the dry ingredients and fold them in until just combined. A few streaks of flour visible in the batter are fine — they’ll disappear in the oven. What you’re looking for is no large pockets of dry flour, not a smooth, uniform batter. The moment it comes together, stop.
The current instruction in most banana bread recipes — including earlier versions of this one — says “mix until thoroughly blended.” That’s the wrong instruction. Mix until just combined is right. The difference in the finished loaf is real: a properly mixed quick bread has a tender, open crumb. An overmixed one is dense and almost gummy at the center.
Why This Recipe Uses Vegetable Oil
The original version of this recipe called for shortening — and many classic banana bread recipes still do. Shortening is 100% fat with no water, which produces an exceptionally tender crumb because there’s nothing to activate the gluten. It works well.
My wife uses vegetable oil, and it works better for this recipe for a simple reason: oil distributes more evenly through the batter than solid shortening does. You don’t have to cream it, you don’t have to bring it to room temperature, and it produces a consistently moist, tender loaf without any extra steps. Oil also keeps the bread moist for longer after baking — loaves made with oil stay tender at room temperature for a day or two longer than those made with solid fat.
Butter is an option some readers prefer — it adds a richer flavor but produces a slightly chewier crumb because butter contains water (about 20% by weight) which activates gluten during mixing. If you use butter, melt it first and let it cool slightly before adding it to the batter. Same quantity.
Start Here: What to Know Before You Bake
- Your bananas need to be almost black. Spotted yellow is acceptable. Mostly brown or black is significantly better. The riper the banana, the sweeter, wetter, and more flavorful your bread will be.
- Frozen bananas work perfectly. Thaw overnight in the fridge or a few hours at room temperature. They'll look brown and collapsed when you peel them — that's exactly right. Mash thoroughly before adding to the batter.
- All ingredients at room temperature. Cold eggs added to oil can cause the batter to seize slightly. Pull everything from the fridge 20 minutes before you start.
- Mix until just combined — and stop. This is the most important instruction in the recipe. A few streaks of flour in the batter are fine. Overmixing develops gluten and produces a dense, tough loaf.
- Test for doneness with a toothpick. Insert into the center of the loaf — it should come out clean or with a few moist crumbs, not wet batter. Start checking at 55 minutes regardless of what the recipe says — ovens vary.
- Rest before slicing. At least 10 minutes in the pan, then transfer to a wire rack. Slicing too early collapses the structure — the loaf is still setting as it cools.
Why This Recipe Works
- Almost-black bananas do three jobs at once. They sweeten the batter, add moisture, and provide the intense banana flavor that yellow bananas can't match. The starch-to-sugar conversion that happens as bananas ripen is the single biggest variable in banana bread quality.
- Vegetable oil produces a consistently tender crumb. It distributes evenly through the batter without creaming, keeps the loaf moist for longer after baking, and requires no advance preparation. Simpler and more reliable than solid fat for this application.
- Baking soda needs acid to activate. The mashed banana provides it — the natural acidity in ripe banana reacts with the baking soda to produce the lift that makes the loaf rise. This is why the ratio of banana to leavening matters and why very ripe bananas produce a better rise than fresh ones.
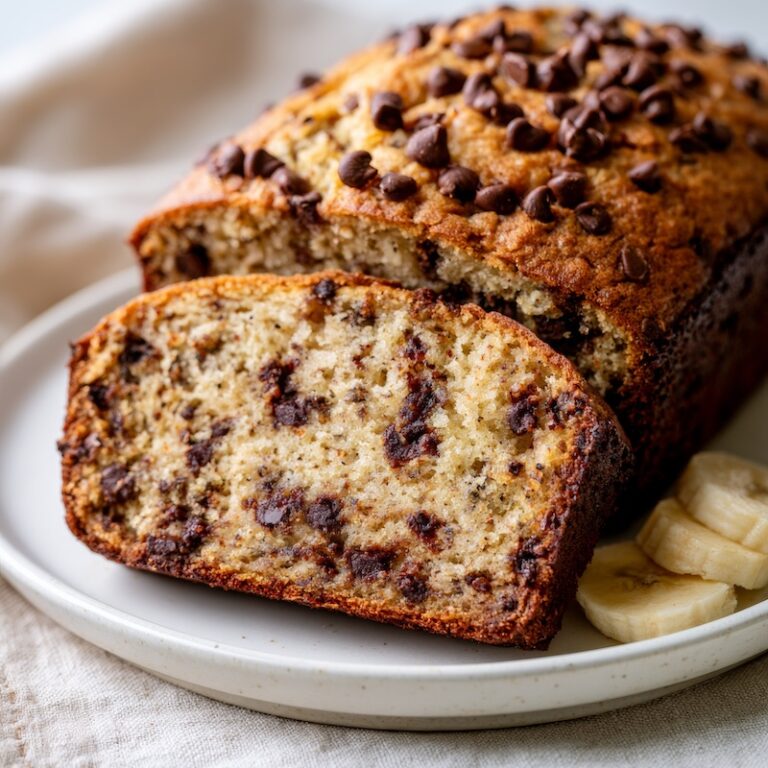
- Chocolate chips in the batter, not on top. Folded into the batter they distribute evenly through every slice. On top they sink or burn. Every bite has chocolate — that's the point.
- Stopping mixing early keeps the crumb open and tender. Minimal gluten development means a quick bread that pulls apart easily rather than one that's dense and gummy at the center.
- The loaf pan size matters. A standard 9x5 inch loaf pan gives you the right ratio of batter depth to baking time. A smaller pan means a taller loaf that takes longer to cook through — the outside sets before the center is done.
My Wife's Banana Bread with Chocolate Chips
Equipment
- 9x5 inch loaf pan
Ingredients
- 3 very ripe bananas mostly brown or black, mashed thoroughly
- ½ cup vegetable oil
- ¾ cup granulated sugar
- 2 large eggs room temperature
- 1 teaspoon pure vanilla extract
- 1½ cups all-purpose flour
- 1 teaspoon baking soda
- ½ teaspoon salt
- 1 cup semi-sweet chocolate chips, tossed in 1 tablespoon flour
Instructions
Preheat and Prep the Pan
- Preheat the oven to 350°F with a rack in the center position.
- Grease a standard 9x5-inch loaf pan with cooking spray or a light brush of vegetable oil, then dust lightly with flour and tap out the excess. Alternatively, line with parchment paper, leaving an overhang on the long sides — this makes it easy to lift the loaf out completely clean.
Mash the Bananas
- Peel the overripe bananas into a large bowl and mash thoroughly with a fork until no large chunks remain — the texture should be almost smooth with a few small pieces. The bananas should be deeply fragrant and almost liquid at this stage. If they're still holding their shape easily, they're not ripe enough.
Mix the Wet Ingredients
- Add the vegetable oil, sugar, eggs, and vanilla extract to the mashed bananas.
- Whisk together until fully combined and the sugar has dissolved into the mixture. The batter will look loose and slightly curdled at this stage — that's normal.
Combine Dry Ingredients Separately
- In a separate bowl, whisk together the flour, baking soda, and salt until evenly combined.
Fold Wet and Dry Together - Carefully
- Add the dry ingredients to the wet ingredients all at once. Fold together with a rubber spatula using broad, gentle strokes — scraping the bottom of the bowl and folding over the top.
- Mix until just combined. Stop when you can no longer see large pockets of dry flour. A few small streaks are fine.
Add the Chocolate Chips
- Toss the chocolate chips in 1 tablespoon of flour to coat them lightly — this helps them stay distributed through the batter rather than sinking to the bottom.
- Fold them into the batter with 3 or 4 gentle strokes. No more mixing than necessary.
Bake
- Pour the batter into the prepared loaf pan and gently smooth the top gently.
- Place in the center of the preheated oven. Bake for 55 to 65 minutes. Start checking at 55 minutes by inserting a toothpick into the center of the loaf — it should come out clean or with a few moist crumbs attached. If the top is browning too fast before the center is done, tent loosely with foil and continue baking.
Rest Before Slicing
- Remove from the oven and let the loaf rest in the pan for 10 minutes — the loaf is still setting as it cools, and cutting too early collapses the crumb.
- After 10 minutes, transfer to a wire rack and wait another 10 minutes before slicing. The wait is worth it.
Notes
What Most Home Bakers Get Wrong with Banana Bread
- Using bananas that aren't ripe enough. Yellow bananas with a few spots will produce a mild, slightly dense loaf. Almost-black bananas produce a sweeter, more tender, more flavorful one. If your bananas aren't ready, put them in a 300°F oven for 15 to 20 minutes until the skins turn black — it accelerates the sugar conversion.
- Overmixing the batter. The most common quick bread mistake. Mix wet and dry ingredients until just combined — a few streaks of flour are fine. Keep going and you develop gluten that makes the loaf dense and tough. Stop early every time.
- Not testing for doneness early enough. Ovens vary more than most home bakers realize. Start checking at 55 minutes with a toothpick regardless of what the recipe says. A toothpick that comes out with wet batter means more time. One with a few moist crumbs means done.
- Slicing too soon. The loaf is still setting as it cools. Cut into it too early and the center collapses and turns gummy. Ten minutes in the pan, then transfer to a wire rack, then wait another 10 before slicing.
- Using a pan that's too small. A smaller loaf pan means a taller loaf that takes longer to cook through — the outside browns before the center is done. Use a standard 9x5 inch pan and you won't have this problem.
- Skipping the toothpick test and going by color. The top of banana bread browns quickly because of the sugar content. A dark brown top does not mean a done loaf — the center can still be raw while the top looks perfect. Always test with a toothpick.
Quick Fixes & Pro Tips
- Bananas not ripe enough? Place unpeeled bananas on a baking sheet and bake at 300°F for 15 to 20 minutes until the skins turn completely black. Let cool before peeling. The heat accelerates the starch-to-sugar conversion and produces a result close to naturally overripe bananas.
- Top browning too fast? Tent the loaf loosely with foil after the first 40 minutes. The foil deflects direct heat from the top while the center continues to cook. Remove for the last 5 minutes if you want the top to color slightly.
- Loaf sinking in the middle? Either underbaked or too much leavening. Make sure the toothpick comes out clean before pulling from the oven. Measure the baking soda carefully — too much creates a rise that collapses as the loaf cools.
- Chocolate chips sinking to the bottom? Toss them in a tablespoon of flour before folding into the batter. The flour coating gives the chips something to grip as the batter sets in the oven.
- Want a crispier crust? After the loaf comes out of the pan, place it directly on the oven rack at 325°F for 5 minutes. The dry heat firms the exterior without overcooking the interior.
- Making muffins instead of a loaf? Same batter, standard muffin tin, reduce baking time to 18 to 22 minutes. Check at 18 minutes with a toothpick. Muffins go from done to overbaked faster than a loaf.
What My Readers Have Tried
- Brown sugar instead of white. Several readers swap white sugar for brown — same quantity or slightly less. Brown sugar adds a mild molasses note and a slightly deeper color to the finished loaf. Works particularly well with chocolate chips.
- Half the sugar. When the bananas are very ripe — almost black — the natural sugar is significant. Some readers reduce the white sugar to ½ cup and find the sweetness still plenty. Worth trying if you prefer a less sweet result.
- Applesauce instead of oil. Same quantity as the oil — ½ cup. Produces a slightly denser, moister loaf with less fat. Works well and is worth trying if you want a lighter result.
- Orange juice and sour cream. One reader adds a splash of orange juice and a spoonful of sour cream to the wet ingredients. The orange adds a subtle brightness and the sour cream adds tenderness. An unusual combination that apparently works well.
- Walnuts instead of chocolate chips. The classic variation — roughly chopped walnuts folded into the batter in the same quantity as the chocolate chips. Adds texture and a slightly bitter note that balances the sweetness of the banana.
- Both walnuts and chocolate chips. Reduce each by half so the total quantity stays the same. The combination works — chocolate for richness, walnuts for crunch and bitterness.
What to Serve With Banana Bread
- MILK. A glass a milk is the perfect accompaniment for banana bread
- Butter, room temperature. The simplest and best. A thick slice still slightly warm from the oven with good unsalted butter is hard to improve on.
- Cream cheese. Plain or very lightly sweetened. The tang of the cream cheese against the sweet, chocolate-chip banana bread is a good combination — closer to dessert than breakfast but worth it.
- Coffee or espresso. The bitterness of good coffee against the sweetness of the banana and chocolate is the right pairing. This is breakfast food that earns its place next to a serious cup of coffee.
- Vanilla ice cream. A warm slice with a scoop alongside turns banana bread into a proper dessert. Particularly good with the chocolate chip version — essentially a deconstructed banana split.
- Sliced and toasted. Day-old banana bread sliced and toasted in a toaster or under the broiler develops a slightly crisp exterior and a warmer, more intense interior flavor. Better than fresh in some ways.
Storage & Make-Ahead
- Room temperature. Wrap tightly in plastic wrap or store in an airtight container. Keeps well for 3 to 4 days. The oil in this recipe keeps the loaf moist longer than butter-based versions.
- Refrigerator. Up to 1 week tightly wrapped. The cold firms the loaf slightly — let it come to room temperature before serving or warm individual slices briefly in the microwave.
- Freezer — whole loaf. Wrap tightly in plastic then foil. Freezes well for up to 3 months. Thaw overnight at room temperature still wrapped — unwrapping while frozen causes condensation that makes the crust soggy.
- Freezer — individual slices. Slice before freezing and wrap each slice individually. Pull out one slice at a time and toast directly from frozen — 2 minutes in a toaster or 5 minutes in a 350°F oven.
- The banana freeze system. My wife's approach: when bananas get too ripe to eat, freeze them in their skins in a zip-lock bag. They keep for up to 6 months. Thaw before using — they'll look brown and collapsed, which is exactly what you want.
Banana Bread Frequently Asked Questions
Q: How ripe do bananas need to be for banana bread?
Riper than you think. The ideal banana for banana bread is mostly brown or almost completely black — soft, fragrant, and collapsed. At that stage the starch has converted almost entirely to sugar, which means the banana contributes more sweetness, more moisture, and a stronger banana flavor than a yellow banana can. A spotted yellow banana produces acceptable banana bread. An almost-black banana produces noticeably better banana bread. If your bananas aren’t quite there, put them in a 300°F oven for 15 to 20 minutes until the skins blacken.
Q: Can I use frozen bananas for banana bread?
Yes — and they may actually work better than fresh. Freezing accelerates the starch-to-sugar conversion slightly. Thaw overnight in the refrigerator or for a few hours at room temperature. When you peel them they’ll be brown, soft, and slightly watery — drain off any excess liquid and mash thoroughly before adding to the batter.
Q: Why is my banana bread dense and gummy?
Almost certainly overmixed. When you mix flour with liquid, gluten develops — and the more you mix, the tougher and denser the result. For banana bread, mix the wet and dry ingredients until just combined and stop. A few streaks of flour in the batter are fine. They’ll disappear in the oven and the loaf will be tender rather than gummy.
Q: Why is my banana bread raw in the middle but brown on top?
The sugar in ripe bananas makes the top brown quickly — faster than the center has a chance to cook through. If the top is browning too fast, tent loosely with foil after the first 40 minutes. Always test for doneness with a toothpick inserted into the center, not by the color of the top.
Q: Can I bake banana bread in a convection oven?
Yes — reduce the temperature by 25°F and start checking for doneness about 10 minutes earlier than the recipe suggests. Convection ovens circulate hot air more efficiently than conventional ones, which means they bake faster and brown more evenly. At 325°F convection (equivalent to 350°F conventional) start your toothpick test at 45 minutes.
Q: Can I make banana bread muffins with this batter?
Yes. Same batter, standard 12-cup muffin tin, fill each cup about two-thirds full. Bake at 350°F for 18 to 22 minutes — start checking at 18 minutes with a toothpick. Muffins go from done to overbaked faster than a loaf so watch them closely the first time you make them.
Q: How do I know when banana bread is done?
Insert a toothpick into the center of the loaf — the thickest point. It should come out clean or with a few moist crumbs attached. Wet batter on the toothpick means more time. Start checking at 55 minutes regardless of your recipe’s stated time — ovens vary and the color of the top is not a reliable indicator of doneness.
Q: Can I reduce the sugar in this recipe?
Yes — if your bananas are very ripe the natural sugar is significant and the added sugar can be reduced. Several readers have successfully made this with half a cup of sugar instead of three-quarters to one cup. Brown sugar is also a good swap — same quantity, slightly richer flavor with a molasses note that works well with chocolate chips.


15 Responses
i love banana bread. I prefer mine without the nuts.
Thanks for this recipe.
wow! good cooking
I followed this recipe exactly and it turned out perfect! No nuts as my son doesn’t like them, in fact he doesn’t even like bananas and he’s devouring it. I had it with a little bit of neufchatel (cream) cheese – DELICIOUS! Thank you 🙂
wow this is the best recipe i have found on the site and i was just experimenting with deserts for a work meeting im holding and i found this …… it was a success (the meeting) and now i always make this bread. thank you 😀
Chef Tom, you are welcome and I know lots of folks who are not fans of nuts and leave them out.
Wendy, my little 9 year old devourers her banana bread too. She likes to add a little honey to it.
Thanks Jessie for the encouraging words.
9:30 at night is a dumb time to crave banana bread. I was intrigued by the title of your web site and decided to try your recipe to use up 3 very ripe bananas.
It was very easy to put together in my food processor. We all loved it in spite of the lack of walnuts. (I was out, but I slipped in a little flaxseed with the flour for a little nutty flavor.)
I checked a few other recipes so I will visit your site again. Thank you. I will keep this recipe on file.
Hey Connie, glad it worked out for you and thanks for commenting. – RG
very nice!! I’m Brazilian, live in Brazil and love cook with bananas!! I’ll try it!!
Hi Cristina, let us know how it turns out for you. – RG
I made with your recipe yesterday, but cut down to half cup of sugar,and my family loved it so much. Thank you. khim
Hi Khim, you are welcome and thanks for sharing your change to the recipe. – RG
I just absolutely love this banana bread and i am just coming back for more!!
Thanks Olyvia – RG
I want to add, I also use a bit less than a cup of sugar. specially when the banaas are very ripe. Lately I have been using BROWN SUGAR and I prefer it, it comes out a nice golden color. Again, great site!
Exactly the way I make mine. When I don’t use chips I add some fresh grated ginger. Great job, congratulations!
This Is A M A Z I N G!
Ive Been Craving For Like Ever.& This Was Delicious. I Love You And That Bread Perfect Combination, I Just Died And Went To Heaven!
-Melissa
I used ”unsweetened applesauce” for the shorting instead same amount 1/2 cup delicious! thanx!
I also add 1/4 c orange juice and 1/4 c sour cream to the recipe. Everyone I make this for loves it and it is moist.
Also, do you use convection baking? A person told me they did and that their bread was really dark and burned on top. She began checking at 45 minutes and is one that bakes to the exact minute the recipe says. Her recipe said 1 hour. Did not allow for conversion of pan type or lower temp for the convection as I am sure her recipe was for conventional oven. Please give me your take on this as she does not believe me and when trying to teach her to cook, she is a doubting Thomas. I have been cooking since I was 5 years old and I am 72. This is just her personality. I want her to learn the correct methods I learned in school and if I can find printed comments, I share these to back up what I have been conveying to her. I even gave her class notes. I am a personal chef for several families.
Yes — reduce the temperature by 25°F and start checking for doneness about 10 minutes earlier than the recipe suggests. Convection ovens circulate hot air more efficiently than conventional ones, which means they bake faster and brown more evenly. At 325°F convection (equivalent to 350°F conventional) start your toothpick test at 45 minutes.