Fast Answer
Pan-seared red snapper with crispy skin requires three things: fillets patted completely dry, a properly preheated pan with neutral oil, and 4–5 minutes of undisturbed cooking skin-side down. The lemon caper sauce builds in the same pan after the fish comes out, using the browned bits left behind for flavor.
One-Pan Lemon Caper Red Snapper Recipe | Easy Weeknight Fish
Red snapper is a fish that rewards restraint. It has a clean, mild flavor, firm flesh that holds up in a hot pan, and skin that crisps beautifully when you give it the conditions it needs.
Most failures — rubbery flesh, soggy skin, fish that sticks — trace back to the same two mistakes: wet fish and insufficient heat. This recipe fixes both, and the lemon-caper sauce takes about 4 minutes in the same pan.
Start Here: Set Yourself Up Before the Pan Goes On
- Dry the fish thoroughly — more than you think necessary. Pat each fillet with paper towels, pressing gently on both sides. Surface moisture is the single biggest reason fish skin doesn't crisp. Some cooks let the fillets air-dry uncovered in the fridge for 20–30 minutes for even better results.
- Bring fillets close to room temperature. Cold fish straight from the fridge causes uneven cooking — the outside overcooks before the center is done. Pull them out 15 minutes before cooking.
- Prep the sauce ingredients before anything hits the pan. Mince the shallot, drain the capers, zest and juice the lemon, chop the parsley. The fish cooks in under 7 minutes. You won't have time to prep mid-cook.
- Use a heavy pan. Cast iron or stainless steel holds heat when the cold fish hits it. Thin pans lose temperature too fast and the sear suffers.
- Neutral oil only for the sear. Butter burns at the temperature you need for crispy skin. Use grapeseed, avocado, or canola for the sear. Butter comes in only after the fish is out of the pan.
What Makes This Recipe Reliable
- High heat + dry skin = crisp texture
- Butter added after the fish prevents burning
- Acid added at the end keeps flavors bright
- Capers replace extra salt with complexity
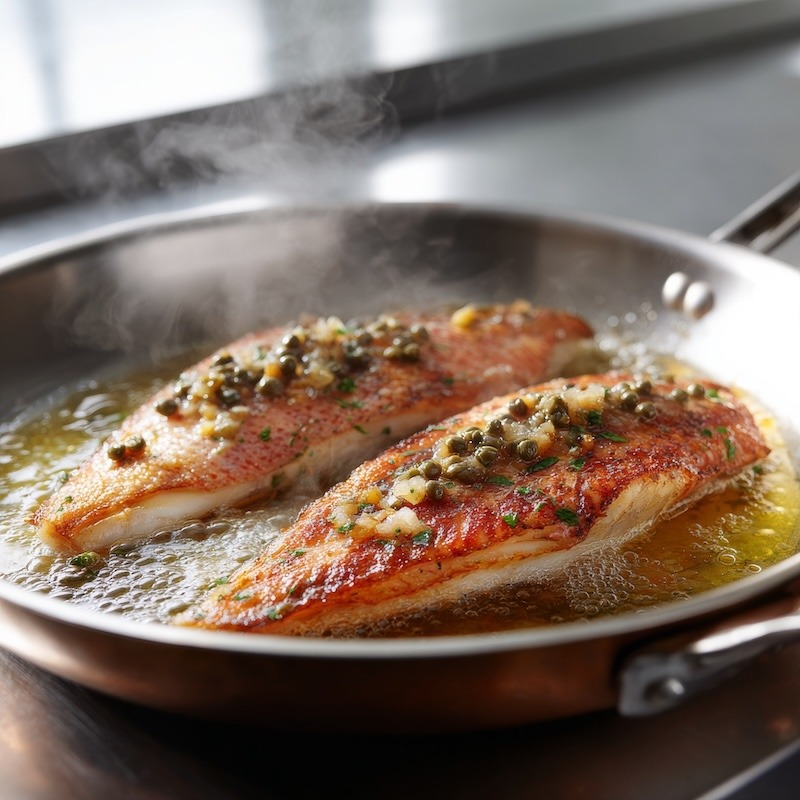
Pan Seared Red Snapper with Lemon Caper Sauce
Equipment
- heavy skillet
Ingredients
For the Snapper
- 2 red snapper fillets skin on (6-8 ounces each)
- kosher salt
- freshly ground black pepper
- 1 tablespoon neutral oil grapeseed or avocado
For the Lemon Caper Sauce
- 2 tablespoons unsalted butter
- 1 small shallot finely minced
- 1 tablespoon capers drained
- ¼ cup dry white wine or chicken stock
- zest from ½ lemon
- 2 tablespoons fresh lemon juice
- 1 tablespoon fresh parsley chopped
Instructions
Before You Start
- Set out everything before the pan goes on. The fish cooks in under 7 minutes and the sauce in under 5. If you're still mincing shallots when the fish is in the pan, something will suffer.
- Pull the fish from the fridge 15 minutes before cooking. Cold fillets cook unevenly.Mince the shallotDrain the capers (rinse them briefly if they seem very salty)Zest and juice the lemonChop the parsleyMeasure the wine or stockCut the finishing butter into small pieces and leave it on the counter — you want it slightly cool, not ice cold
Dry the Fish
- Pat each fillet completely dry with paper towels — top, bottom, and the edges. Press gently and repeat. The skin needs to be as dry as possible before it touches the pan.
- Season both sides with kosher salt and black pepper just before cooking, not in advance. Salt draws moisture to the surface. Season, then cook.
Heat the Pan
- Place a heavy skillet (cast iron or stainless steel) over medium-high heat. Let it heat for 1-2 minutes before adding any oil.
- Add 1 tablespoon of neutral oil — grapeseed, avocado, or canola. Swirl to coat. Wait until the oil shimmers and just begins to show the faintest wisp of smoke. That's the moment the pan is ready.
Sear the Snapper, Skin-Side Down
- Lower the fillets into the pan skin-side down, placing them away from you to avoid oil splatter. The moment each fillet touches the pan, press gently across its length with a spatula for the first 10 seconds.
- Leave the fish completely undisturbed. Do not move it, shake the pan, or check underneath. Cook for 4–5 minutes, until the skin is deeply golden and the opacity in the flesh has climbed about three-quarters of the way up the side of the fillet.
- The fillet will release from the pan on its own when it's ready. If it resists when you try to lift an edge, give it another 30–60 seconds.
Flip & Finish
- Pour off any excess oil from the pan, leaving the browned bits (fond) on the surface — that's flavor. Reduce the heat to medium.
- Add 2 tablespoons of unsalted butter. Let it melt and begin to foam. Add the minced shallot and cook, stirring, for about 30 seconds — until it softens slightly but doesn't brown.
- Add the capers and stir once to distribute.
- Pour in ¼ cup of dry white wine or chicken stock. The liquid will sizzle and the fond will release from the pan — scrape the bottom with a wooden spoon or spatula to lift it all into the sauce. This is the flavor base.
- Simmer for 1–2 minutes until the liquid reduces by about half.
- Add the lemon zest and lemon juice. Stir to combine. Simmer for 30 more seconds. Taste the sauce — it should be bright, slightly rich, and briny from the capers. Adjust with a pinch of salt if needed. Add the chopped parsley and stir.
Plate & Serve
- Spoon the lemon caper sauce over each fillet generously. Serve immediately — the skin softens within minutes once sauced, so there's no benefit to waiting.
Video
Notes
- A pinch of red pepper flakes in the sauce
- A splash of cream for a softer finish
- A few sliced olives if you want a Mediterranean lean
What Most Cooks Get Wrong
- Not drying the fish enough. A quick pat isn't sufficient. Surface moisture creates steam, and steam is the enemy of a sear. Take an extra 30 seconds and dry the fish properly.
- Starting with a cold or underheated pan. If the oil isn't shimmering before the fish goes in, the skin will stick and won't crisp. Wait for the pan to come fully up to temperature — it takes longer than it seems.
- Moving the fish too soon. The fillet will stick if you try to move it before the skin has properly seared. Leave it alone. It will release when it's ready.
- Flipping too early or too often. Red snapper fillets cook mostly on the skin side. The flip at the end is brief — 1 to 2 minutes maximum. Flipping early just steams the skin in its own moisture.
- Using butter for the sear. Butter's smoke point is too low for the heat you need. It browns and burns before the skin has time to crisp. Save the butter for the sauce.
- Adding lemon juice too early. Lemon juice added while the pan is still very hot cooks off immediately and can turn bitter. Add it at the end of the sauce, off aggressive heat, and it stays bright.
Quick Fixes & Pro Tips
- Skin still won't crisp? The pan wasn't hot enough or the fish was wet. Next time, let the pan heat for a full 2 minutes before adding oil, and dry the fillets more aggressively.
- Fish sticking to the pan? Don't force it. Give it 30–60 more seconds. Properly seared fish releases on its own. If it's genuinely stuck, your pan wasn't hot enough at the start.
- Sauce too acidic or sharp? A small additional knob of cold butter whisked in at the end will round the edges. Capers also carry brininess — rinse them briefly if the sauce tastes too salty overall.
- No white wine? Chicken stock works. A dry vermouth also works well and adds a slight herbal note that complements the capers.
- Fillets uneven in thickness? Score the thicker end lightly with a knife (two or three shallow cuts through the skin) before cooking. This helps it cook at the same rate as the thinner tail section.
- Want more richness? Add a small splash of heavy cream to the sauce after the wine reduces, simmer briefly, then add the lemon and capers. It softens the acidity and makes the sauce coat the fish more generously.
What to Serve With Pan-Seared Red Snapper
- Roasted or mashed potatoes. The lemon caper sauce is assertive enough to work with something starchy underneath. Potatoes soak it up without competing with the fish.
- Sautéed spinach or wilted greens. A fast sauté with garlic and olive oil takes five minutes and provides a natural, slightly bitter contrast to the rich butter sauce.
- Simple rice or couscous. A neutral base keeps the focus on the fish and gives the sauce somewhere to go on the plate.
- Roasted asparagus or broccolini. The slight char from roasting holds up against the acidity of the lemon caper sauce better than steamed vegetables.
- Wine pairing. A crisp, unoaked white is the natural match — Muscadet, Vermentino, or a dry Provençal rosé. Avoid anything oaky or buttery (heavily oaked Chardonnay) that will compete with the lemon butter sauce. Champagne or a good dry sparkling wine also works well with crispy fish skin.
Storage & Make-Ahead
Storage: Pan-seared fish is best eaten immediately. The crispy skin softens within minutes as the fish sits, and there’s no real way to restore it after the fact. If you have leftovers, refrigerate the fish and sauce separately for up to 2 days.
Reheating: Reheat gently in a covered pan over low heat with a small splash of water or stock to add moisture. Do not microwave — it ruins the texture of the flesh entirely. The skin will not re-crisp.
Make-ahead elements: The sauce ingredients can all be prepped in advance — shallot minced, capers drained, lemon zested and juiced, parsley chopped. Store them in small bowls and the sauce itself comes together in under 5 minutes once the fish is done.
The honest note: This is not a make-ahead dish. It’s a 20-minute dinner designed to go straight from pan to plate.
Frequently Asked Questions
Q: How do I know when the red snapper is done? The fillet will turn opaque from the bottom up as it cooks skin-side down. When the opacity has climbed about three-quarters of the way up the fillet, it’s time to flip. After 1–2 minutes on the flesh side, the fish should flake easily when pressed gently at the thickest point. If it resists, give it another 30 seconds. Don’t cut into it to check — that lets the moisture out.
Q: Can I use this technique with other fish? Yes. Any firm, skin-on white fish fillet works — sea bass, striped bass, branzino, halibut, or flounder. Thinner fillets (flounder, sole) need less time — check after 2–3 minutes. Thicker fillets (halibut steaks) may need a brief finish in a 400°F oven after the sear.
Q: Why does my fish always stick to the pan? Two causes: the pan wasn’t hot enough when the fish went in, or the fish was moved before the sear was complete. A properly seared fillet releases on its own. If it won’t move, wait. Don’t force it — you’ll tear the skin.
Q: Do I need skin-on fillets or can I use skinless? Skin-on is strongly recommended for this method. The skin protects the flesh during the sear, acting as a buffer against the direct heat. Skinless fillets cook faster, stick more easily, and lose the textural contrast between crispy skin and moist flesh that makes this dish worth making.
Q: What’s the best pan for searing fish? A well-seasoned cast iron skillet or stainless steel pan. Cast iron holds heat better and gives the most consistent sear. Stainless steel also works well and allows you to see the fond clearly as the sauce builds. Non-stick pans can’t get hot enough to crisp skin properly and don’t build fond for the sauce.
Q: Can I substitute something for the capers? Capers provide both brininess and a slightly floral sharpness. If you don’t have them, finely chopped green olives make a reasonable substitute. A few drops of fish sauce added to the lemon butter also adds a similar savory depth, though without the texture.
Q: How do I prevent the butter from burning when making the sauce? The fish comes out first, then the heat drops to medium before you add the butter. The pan is hot but not screaming — if the butter browns immediately and smells nutty, it’s fine and adds flavor. If it turns dark and acrid, the pan was too hot. Pull it off the burner briefly and let it cool for 30 seconds before proceeding.
Q: Is there a good way to score the skin so it doesn’t curl? Yes. Two or three shallow diagonal cuts through the skin (not into the flesh) at the thickest end of the fillet will keep it from contracting and curling when it hits the heat. You can also just use the pressing technique — hold the fillet flat with a spatula for the first 10 seconds. Both approaches work.


